How to make Half Rectangle Triangles
In this tutorial, I will be walking you through the steps to make Half Rectangle Triangles (HRT). Learning how to make HRTs is a great way to improve your quilting skills. There are several different methods for making and trimming HRTs. The method I will explain starts out using two rectangle pieces to create two HRTs.
Practice making HRTs with some scraps. The more you practice, the more comfortable you will be with not only making, but also trimming HRTs.
Unlike Half Square Triangles, HRT have two different orientations (right sided & left sided). I will walk you through how to make both. In this tutorial, I refer to the right sided HRT as the one where the seam line meets at the top “right corner” and the left sided HRT as the one where the seam line meets at the top “left corner”.

Getting started:
I recommend starting with two rectangle pieces of fabric that are 1” longer and 1” wider than your desired ending HRT. There are other tutorials and blog posts that may suggest starting with different sizes, however I have found that 1” longer and 1” wider works the best for this method.
The finished size of the HRTs I am making is 2 ½” x 4 ½”. I start out with two rectangle pieces that are 3 ½” x 5 ½”.
I'll walk you through the right sided HRT first.
Right Sided:
Take the two rectangle pieces of fabric and place them RST.

Rotate the top rectangle piece so the top left corner aligns with the top right corner of the bottom rectangle and the bottom right corner aligns with the bottom left corner of the bottom rectangle.

Draw one diagonal line from corner to corner and pin in place.

Sew 1/4” on each side of the line. Using a rotary cutter, cut along the diagonal line drawn from corner to corner.
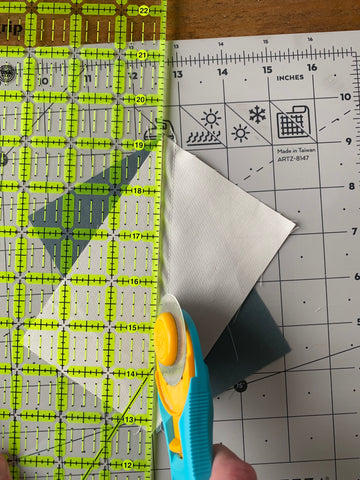
Press the seams open.

Now, I will you through the left sided HRT.
Left Sided:
The steps are very similar to the right sided, however you rotate the top piece of fabric the opposite way.
Rotate the top rectangle piece so the top right corner aligns with the top left corner of the bottom rectangle and the bottom left corner aligns with the bottom right corner of the bottom rectangle.

Draw one diagonal line from corner to corner and pin in place. Sew 1/4” on each side of the line.

Using a rotary cutter, cut along the diagonal line drawn from corner to corner. Press the seams open.
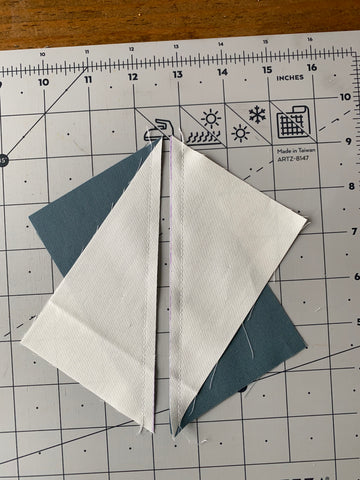
Here is what the untrimmed left sided and right sided HRT should look like.

Now, I will walk you through trimming both.
Trimming HRTs:
This method includes leaving 1/8” gap between the corner of the HRT and the diagonal seam line. This gap helps with creating points when sewing the HRT to other pieces in a quilting project.
For this tutorial – I am making 2 ½” x 4 ½” HRTs. I will be using the 2 ½” and the 4 ½” ruler marks as reference points. Red arrows are used to point out these marks, as well as the 1/8” mark.
I'll walk you through trimming the right sided HRT first.
Right Sided:
Carefully place your quilting ruler on top of the HRT. Line up the 1/8” mark at the top corner of your ruler (see the red arrow for reference). Note: The second red arrow indicates where the two ¼” lines meet. Making sure this is along the HRT seam line will also help to line up the ruler properly.
The intersection point of the 2 ½” line and the 4 ½” line should be 1/8” from the HRT seamline (see the red arrow at the bottom left corner of the picture). Note: The second red arrow (at the bottom corner of the picture) indicates where the two ¼” lines meet (opposite the 2 ½” and the 4 ½” corner).

Here is a closer look at both ends.


Carefully trim two sides from the HRT.

Rotate the HRT 180°. Again, line up the 1/8” mark with the HRT seam line. The intersection point of the 2 ½” line and the 4 ½” line should meet at the trimmed corner.

Trim the remaining two sides.

Here is the trimmed right sided HRT.

Left Sided
The process will be the same, however you will be lining up with the other corner of your ruler.

Carefully trim two sides.

Rotate the HRT 180°.

Line up the 1/8” mark with the HRT seam line. The intersection point of the 2 ½” line and the 4 ½” line should meet at the trimmed corner.

Trim the remaining two sides.

Here is the trimmed left sided HRT.

And there you have it! Two nicely trimmed HRTs!

Helpful tips:
Do what is comfortable based on which hand you use to hold your rotary cutter. The HRT can be rotated and the ruler can be used on either end, depending on if you are right or left handed.
Use washi tape or masking tape to mark the lines on your ruler, so you don’t mix up the lines. So in this case, I would place tape along the 2 ½” line and the 4 ½” line. This will help you remember where to line up.
Go slow and practice! Grab some scraps and have some fun!
Thank you, the most clear instructions without having to buy expensive templates or another ruler!!